Tuesday, March 20, 2012

Sheital Hang Ups

I don't have a spare empty shelf in my closet nor do I have free counter space on my dresser.  The question was where to put my sheitals and falls that wouldn't require giving up space needed in my bedroom.   I have two sheitals and two falls, and having 4 styrofoam heads was not a good solution for me since it takes up too much space (and they're kind of creepy looking).  I happened to be in Ikea when I got inspired with a good idea.  Ikea has these great sturdy toilet paper holders that can be placed vertically or horizontally.

It's flat on top so it won't damage the net

I decided that using these as a type of 'hook' could really work.  So I had my dear hubby drill these guys into a hidden corner in my bedroom and 'voila'!  My sheitals have a home which doesn't take up significant space in my room. I made sure to put them on a wall that you don't see when you walk into the room otherwise it could be an eyesore.

Great for sheitals and/or your husband's hat 

A friend of mine had a similar idea and had her carpenter add a shelf to the side of her closet and put her sheital holders on it.  Take a look...


Do you have any other solutions for your sheitals?  Let me know what you came up with!

Wednesday, February 15, 2012

Kitchen Layout


I just read a very helpful blog post on a blog called 'creative juice'.  It shows great pictures on smart and terrible kitchen layouts with explanations for each.  I highly suggest that anyone who is planning a kitchen read this first so that you don't make the same mistakes as some of these high end kitchens did. Check it out...

 http://studiobcreativejuice.blogspot.com/2011/06/what-were-they-thinking-thursday_09.html


More Backsplash Inspiration

I have been collecting more pictures of backsplashes over the last little while.  There are just so many different ideas to be inspired by.   If you can't afford to redo your backsplash at this time and you're looking for another way to enhance the look of your existing kitchen you can always just add new knobs/pulls to your cabinetry.  It's like changing the buttons on a cardigan, it can give you a whole new look.  Don't forget that if you already have a simple backsplash you can always add a few mosaics even at this point just like I did in my bathroom makeover.  Enjoy the new pictures....

I love all the earth tones
I saw similar subway tiles to this at Beit HaKeramica
I went to Beit HaKeramica and they have a nice selection of backsplash ideas upstairs.  Here's a few samples of what I saw...

Subway tiles like the previous picture
Caramel beige stone look
A beautiful olive color modern stone design
There are a few special tiles mixed in to add interest
Glazed ceramic subway tile
Of course, there were a lot more to choose from...it's like going to a candy store.  I'll keep my eye open for more ideas.

Tuesday, February 14, 2012

Sock Organizer

My mother in-law just gave me a gift the other day called the 'drawer organizer'.  I decided to use it for my daughter's socks and tights that fill up one smallish drawer.  This organizer is a bunch of wavy pieces of plastic that click together and form compartments.  It can be used for socks, underwear, jewellery, ties, belts etc.  My daughter's socks went from a pile in her drawer that she had to dig through, to being super organized.
The package for the 'drawer organizer' looks like this....

Totally light weight and compact

My daughter's sock drawer now looks like this...

You can attach as many rows as you need to fit the drawer

I don't know where to buy this in Israel yet but for any of you who go to chutz l'aretz I checked on line to see where you could pick this up.  You could search on Amazon.com,  I saw one for around $10 that looked like this....

'Honey-Can-Do' drawer organizers
This is what I have $9.90 on Amazon.com

Or, you can get something that does the job, here at IKEA.  It comes in compartments of 9 so you have to measure and see what fits in your drawer.   You could put more than one pair of socks in each square.

46 cm by 56 cm
I never would have thought to buy such a thing but now that I have it I really think it's fantastic.  So a big 'thank you' to my mother in-law!   Oh and I need more for the other kids!

Monday, February 13, 2012

My Bathroom Makeover

I bought my house secondhand and many of the choices made in the design were far from what I would have liked.  But, it is what it is and I have tried to make things work with a little bit of DIY (do it yourself projects) and decorating.  We don't have the budget right now to make the house of our dreams but one step at a time we can make improvements. 
I really didn't like my main bathroom floor.   It bothered me.  The tile was a dull greyish bluish color that had some texture.  The original grouting job was done so poorly that all the grooves in the tile had hard dry grout that was not removable.  My floors looked eternally dirty which is something I can't handle.  There was also a small area separated by a metal floor frame for a potential shower (which I didn't want) so the floor ended up looking 'choppy'.  The time had finally come when I decided to re tile the bathroom floor.
   I spoke to Shelley Winick (0507178123...he does tiling, drywall, electrical, pergolas etc.) and he calmly explained to me that I did not need to rip up my old floor to put a new one in.  He was able to lay down new tiles on top, no problem.  Yeah!  that makes things less expensive.  I called my friend Tova and told her the good news.  She has the exact same bathroom as me and was just as miserable.  We set off on our mission to buy new bathroom floor tiles.  Our bathroom was not even 2 square meters so it was not a big investment.  We looked for something that fit our budget and we did the 'spit' test.  My friend Yael introduced me to this test when we went to choose tiles for our front walkway.  You need to spit on the tile, then walk all over it with your dirty shoes and look at the damage.  If it's really noticeable then 'bye bye'.  If it's minimally noticeable, then it's an option.  We finally chose two completely different tiles (after a couple of hours!) and made our order.   I also chose one sheet of mosaics to tie the existing wall tile and the new floor tile together.  Here's what I chose...


Wood tile

I picked out a mosaic sheet that would compliment the floor tile and the existing wall tile.

I like the copper squares with the etching on it

The wall tile, floor tile and the mosaic.
Now let's take a look at the process....

The old tiles were 'scored' for better adherence

I decided to 'stagger' the new tiles for an authentic hardwood floor look.  I also had the legs of the vanity sawed off so that we wouldn't have to cut the new tiles around them.  The legs weren't necessary in actually holding up the vanity.  A few hours later the tiles were basically down...

It's hard to see with all the dust but I was so excited

The floor had to dry for a couple of days and then Shellie came back and did the grout.

I chose a greyish brownish grout

After that I had diamond shaped cut outs done on the wall tile for the mosaics.

There were a total of 8 diamonds made around the bathroom
As luck would have it Shellie had another commitment and couldn't come back for 2 weeks.  So, being impatient like I am, I decided to take matters into my own hands and do the rest of the job.  I bought tile cement (ready to go in a small tub) at 'HaKol L'Bayit' in the Merkaz.

This cost me 20 shekel
I smeared the stuff in each diamond and carefully placed a section of mosaics in the area.  I let it dry over night and the next morning I grouted it...

I mixed the grout powder with water until it was like hummus.
The grout always looks like a different color when it's wet, so don't panic.  It dries much lighter!  Now, for the cleaned up finished picture....

Not the greatest lighting yet but you get the picture


Here is the bathroom almost completed, I still have to get the light fixture up which will enhance the whole picture.

The new bathroom


Another angle

There was a small amount of mosaics left over so of course I put them to good use.  I bought a cheap ceramic soap dispenser at HaMachsan for 15 shekel and just added some mosaic and grouted it.


Stay tuned for the cool light fixture I chose.  I got it at Machsane Teora and loved it right away.  I was able to buy a regular light fixture since there is no shower or bath in this bathroom otherwise you have to choose one suitable for moisture.

Thursday, February 9, 2012

What's to choose first in the Kitchen.


What should you choose first in your new kitchen? Let's hear some different opinions from our local talents...
 
Michal Landau (interior designer)-"I would say that the first thing you should think about is cabinets, it's by far the most dominant material in the kitchen and you need to start there before thinking about anything else."
Naomi Goldberg (in interior design school)-"I say, choose the part that is most important to you first,  the one that you love or have in your mind (like solid wood cabinets or a granite counter)  and coordinate everything else with that."
Aliza Freedman (interior designer)-"When it comes to choosing a kitchen, I generally recommend to decide on the carpentry materials first because it’s the most dominant part of the kitchen. But, if a client has a particular counter that they “must have” than they can start with that counter and from there choose the rest."
Atara Lavi (interior designer)- "The cabinets are the dominant element in the kitchen and the floors, counters and backsplash are complimentary to that. Therefore, the cabinets should be chosen first then the countertops and floors and lastly the backsplash."


 Lastly,in my own opinion from experience.....if you are going with granite then choose that first.  You need to fall in love with your granite and usually you may not know which slab is going to be the one to grab your attention.  I went to the granite yard looking for something beige based and I ended up choosing a green shade.  With your granite sample you can then choose a cabinet color that enhances the granite.  Granite has so many shades in it and can be so busy you need to have a sample with you before you choose anything else.  Then comes the backsplash.  If you are using Ceasarstone you could probably choose a cabinet color first, then the counter top.  Ceasarstone is more uniform in color and not as deep as granite. 
Tuesday, February 7, 2012

The Boots Dilemma

This is just a short but sweet post to inspire my sister living in wintery cold Toronto.  She has 2 boys and their wet boots to deal with in her small entryway.  I picked these pictures off of another blog (jdorganizer.blogspot.com) and I think they're inspiring. 

You could put this outside under an awning
Pretty and delicate
8 pairs of boots or shoes ....solid and simple
multi purpose rack
If you don't want a heavier wood rack this has a lighter look

One last one from Martha Stewart who definitely keeps things looking stylish....

You can buy bags of large pebbles at the dollar store

The Shoe Dilemma


The mess
Okay, when you add up all the pairs of shoes that end up in my front hall everyday it usually ranges from 7 pairs to at least 10 pairs.  My five kids all walk into the house after school and right away their shoes come off. I end up with a pile of scattered shoes by the front door in a matter of seconds.  Add a few friends to the equation and that pile becomes a mountain.  We have a very open house and friends come and go and hang out everyday.  The shoe situation was getting out of hand so I started to brainstorm and came up with a few failed solutions until I found one that worked for us.

SOLUTION #1
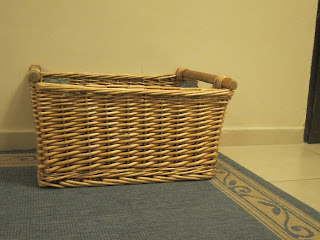
This beautiful basket did an okay job but in the end  it was a diving expedition to find your shoes in the rushed morning minutes.  The kids ended up dumping the entire thing to find their shoes, and not all the shoes fit.  However, this would be great for a much smaller family.


SOLUTION #2
I bought this thing imagining a neat line of shoes stacked nicely by the front door.   I wanted something easy and available as soon as you walked in.   Well, it failed big time.  The 'shelves' were on an angle and the shoes constantly slid off.  No one wanted to spend the extra time placing their shoes there neatly and once again there wasn't enough space for all the shoes.  I spent my time lining up all the shoes perfectly everyday only to have my 3 year old grab his shoes and cause an avalanche of the rest of them falling off.  When you have kids in the equation you have to be realistic!


SOLUTION #3
I bought this great bench at Ikea (in the discount 'metzion' corner) and it's worked out really well.  It gives us a place to sit down when we put on our shoes and a spot to put our bags on after school.   It also has available space under it for our shoes.  I started off putting our shoes under it on shoe mats and it basically worked out but....it was an eyesore for me and I wasn't happy.   I went to Homeplace in the Merkaz and found these baskets with a woven pattern that I liked right away. They also come in chocolate brown but they were sold out and I was desperate to get things in place. The baskets are strong, washable and three fit perfectly under the bench.  One basket for my husband's and my shoes, one for the kids Crocs or sandals, and one for their sneakers/school shoes.  It looks neat and the kids just have to throw their shoes in.  We find that it's easy enough to dig out our shoes in this size basket.  This solution was the WINNER!

Nice and neat

Everyone's dress shoes go in their bedroom closet and boots go in the small front hall closet since we hardly use them.  The good thing about these baskets is that if I ever need to move them out of the way temporarily, to vaccuum or if I'm doing an event in living/dining room, they stack perfectly and have handles on each side.  Lastly, if the younger kids still leave their shoes out it is an easy tidy up for me which is always an important factor.

Here are some other solutions...

  This is open in the back for ventilation
The next few are off the web...

Nice but only holds 6 pairs of shoes
This keeps it all out of eyesight
"house to home" You could get this made from formica
This is a piece of furniture!
I like this a lot, You can put your keys and a phone on top
Now here are some pictures of shoe storage solutions from Ikea.  The one in Rishon Letzion is literally a 30 minute car ride away.

'Hemnes' Comes in 3 colors
'Grevback'
Bench with storage-You could paint this
This hangs in the closet
'Stall' Comes in 3 colors and in another shape
 If you've come up with a solution that you're happy with then send me a picture!